Remotely login into SSH and SFTP is relatively easy from any operating system, whether a Windows PC or macOS; the internet developer community has a solution for everything.
Thankfully, macOS has an in-built Terminal app that allows login SSH telnet remotely. While for Windows OS, we can use an open-source program – PuTTY.
For SFTP, we will be using a software called FileZilla that’s available for both macOS and Windows PC – it’s again Open Source Software available for Free!
You can even log in locally on Android OS smartphones using a few apps in the Google Play Store. However, in this post, we will be focusing on login SSH and SFTP on Windows OS or macOS only.
Also, if you’re following our #CloudServer Series, this is the second article and video demo (added below) on SSH and SFTP connection setup.
If not, check out our previous post on creating an Ubuntu cloud server on DigitalOcean.
Let’s start with SSH first —
What is SSH?
According to TechTarget,
SSH, also known as Secure Shell or Secure Socket Shell, is a network protocol that gives users, particularly system administrators, a secure way to access a computer over an unsecured network.
So basically, as Ubuntu Server owners, we will be accessing our Cloud Server, which is hosted in a different part of the world, remotely using SSH from our home computer. SSH acts as a secured gateway and bridge which authenticates and sends encrypted data communication between two systems.
In our case, we will be using the SSH tunnel to run command scripts for making changes to the system and software at the administrative level. We will be installing, removing, deleting, and managing the entire virtually hosted server using SSH.
While the SSH clients can not access the files or perform data transfer, we need an SFTP client to do the same.
Login SSH with MacOS Terminal App
While Windows does not have any built-in support, we have Mac OS with Terminal App, which allows for remote SSH connection.
To log in via SSH connection, you need to have:
- IP Address of the Ubuntu Cloud Server
- Username – default is root
- One Time Password
You might have already received all these three pieces of information in the mailbox when you spin a new droplet on DigitalOcean. Check out the video demo below for more information.
Now let’s follow the steps to connect and login SSH using the Terminal App:
- Open the Terminal App on macOS
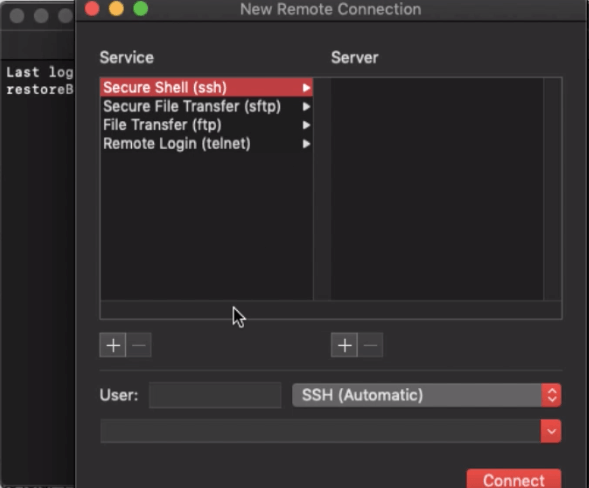
- From the Menu bar, open the Shell options list and select New Remote Connection.
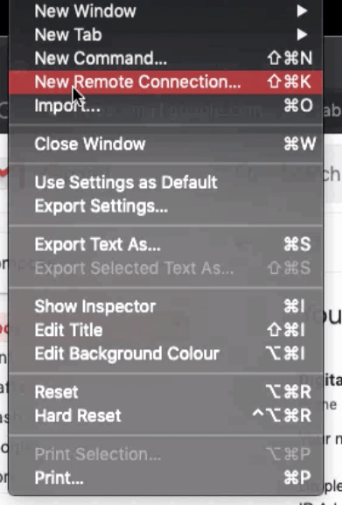
- This will open a new window for New Remote Connections Service – select the Secure Shell (ssh) from the list.

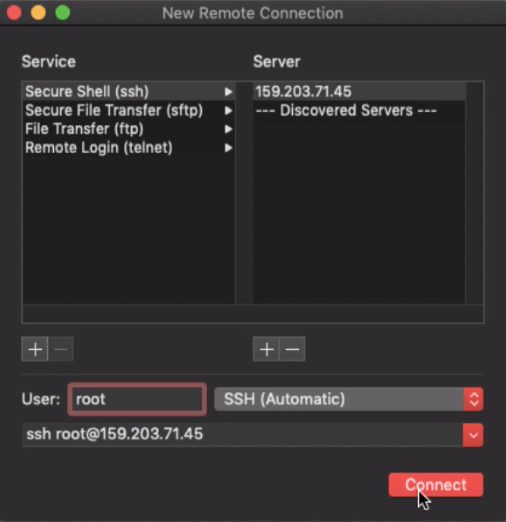
- Hit on the + in the Server section to add the Cloud Server IP Address to the list and press the OK command
- Now in the User field, enter the username as root and finally hit on Connect command button

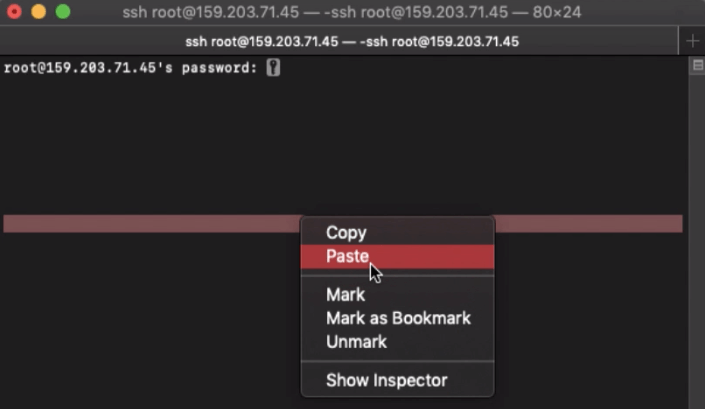
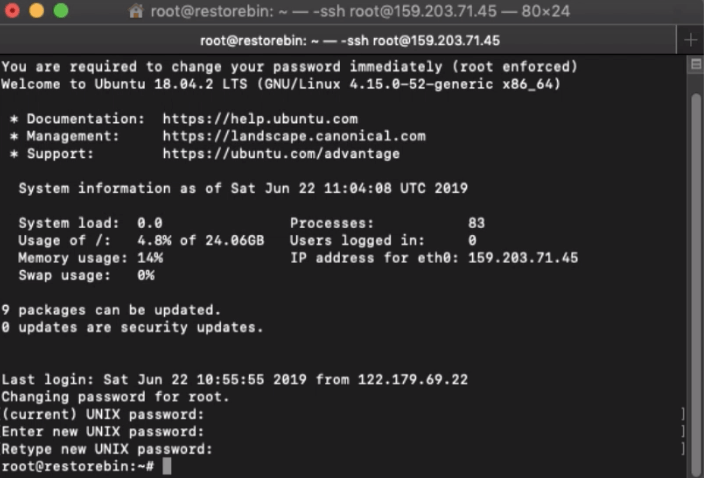
- A new window with a remote SSH connection will open asking to enter the password – copy and paste the one-time password received in your mailbox.

- Since we are signing in for the first time using the One Time Password (OTP), the Server will request to set a new Unix Password for the future.
- Enter the current UNIX Password (OTP)
- Enter the new UNIX Password
- Reenter the new UNIX Password

- That’s all; we’ve successfully logged into Ubuntu Cloud Server and managed to set a new UNIX password apart from the OTP.
Now go ahead and learn how to log in Ubuntu Cloud server via the SFTP client. You can follow our next guide on installing a powerful LEMP stack on Cloud Server.
Login SSH with PuTTY on Windows PC
Login SSH in Windows PC is similar to what we did for Mac OS earlier. But, Windows does not have the built-in program to allow remote connection, hence will be using PuTTY.
If you’re using the Mac OS and followed the steps mentioned above, you can skip this section or continue reading for informational purposes.
As mentioned earlier, PuTTY is a tiny open-source program that helps enable the SSH capability in Windows OS.
Firstly, download the latest stable version of PuTTY from its official site, then we will see how to use PuTTY for SSH connection.
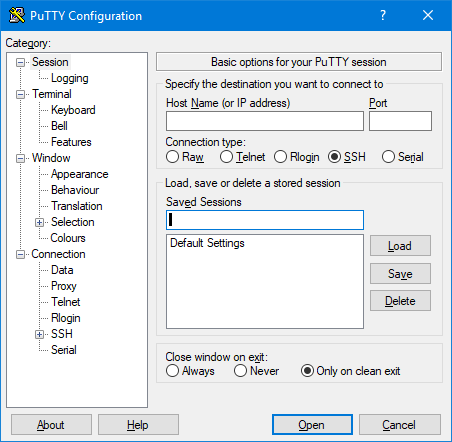
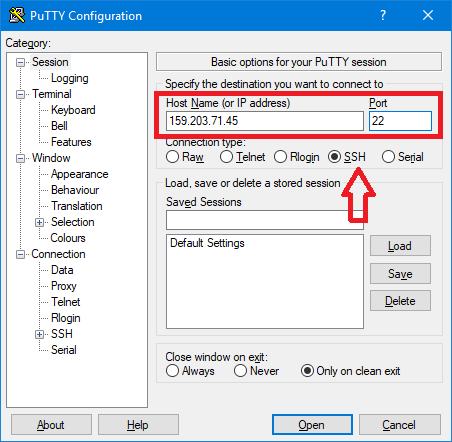
- Download and Open PuTTY on Windows PC (no installation required)

- Enter the IP Address of your Ubuntu Cloud Server; the IP of my server is 159.203.71.45
- Enter the SSH Port as 22
- Set the Connection Type as SSH

- Hit on Open command button on the PuTTY window
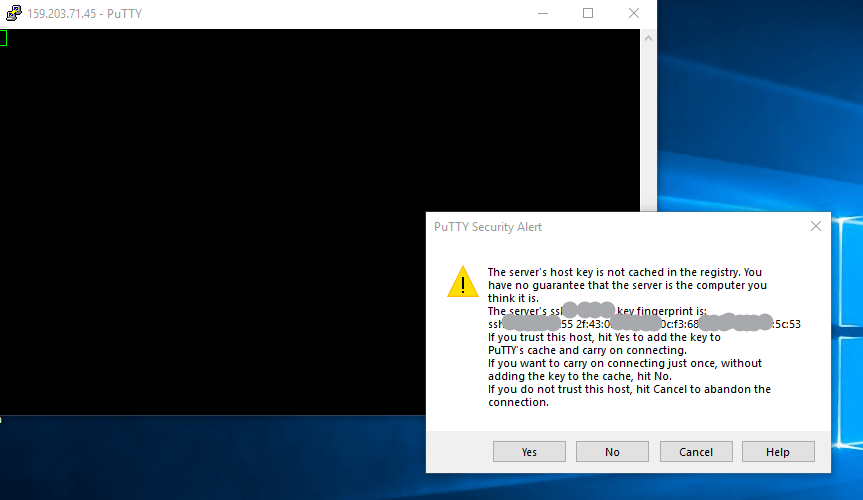
- It will open the SSH Host Key Fingerprint for the first time, which will be saved locally and used for authenticating future SSH connections.

- Just hit on Yes command button to allow the secured connection
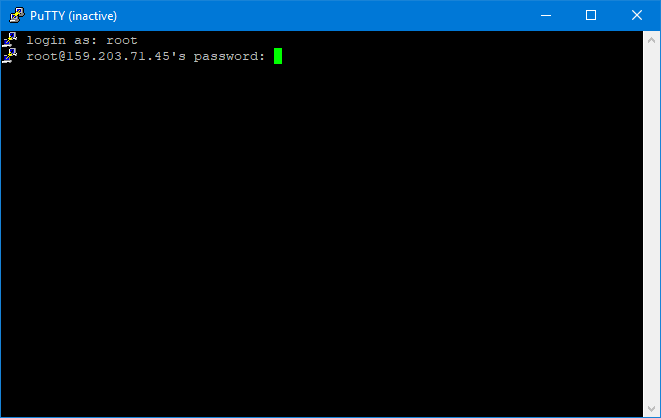
- A blank screen with a login username is requested; enter the login name as root and hit Enter button

- Next, it will request the password – enter the One Time Password that you’ve received in your email box from DigitalOcean after creating the droplet
- The password is not visible while typing in the PuTTY client
- Tip – you can copy the password from the mail and paste it using the mouse right-click button
- You’ll be asked to enter and confirm a new root password; the password we used in the previous step was valid for the first-time login only
- That’s it; you’ll be logged into your Cloud Server successfully
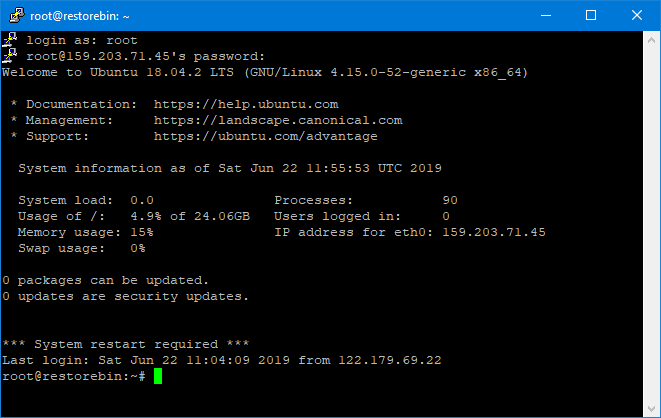
The new password you’ve set up in step #10 is your root login password in the future. You can easily access the droplet via SSH using the same.
To reboot the Ubuntu Cloud server, enter the below command in PuTTY Terminal.
reboot
Moving on to SFTP —
What is SFTP?
Secure File Transfer Protocol(SFTP) is a secure version of File Transfer Protocol(FTP), which facilitates data transfer over SSH connections. Hence, SFTP is also known as SSH File Transfer Protocol.
Using the SFTP client, you can connect and access the files and folders in your Cloud Server. The SFTP help in adding, modifying, deleting, and managing entire files remotely.
You can even download the file in your local system, modify per needs, and upload it back into the cloud server. All the changes made using SFTP are practically updated in real time.
I use the FileZilla SFTP client, which is available for Windows PC and macOS.
Remotely Login SFTP with FileZilla Software
SFTP client makes life easier for the server administrators.
You can access the cloud server files like your local hard disk files and make changes using favorite editors like Notepad++, VS Code, Sublime Text, etc.
I recommend using the FileZilla SFTP client, which you can download from their official website. FileZilla is free and open-source software, and its developer actively releases the update. For macOS users, it also supports dark mode!
After download, you need to install the application on Windows or Mac OS like any other software installation.
Follow the steps to login SFTP using FileZilla Client software:
Assuming you’ve already installed the software. The steps are almost the same for Windows PC and Mac OS.
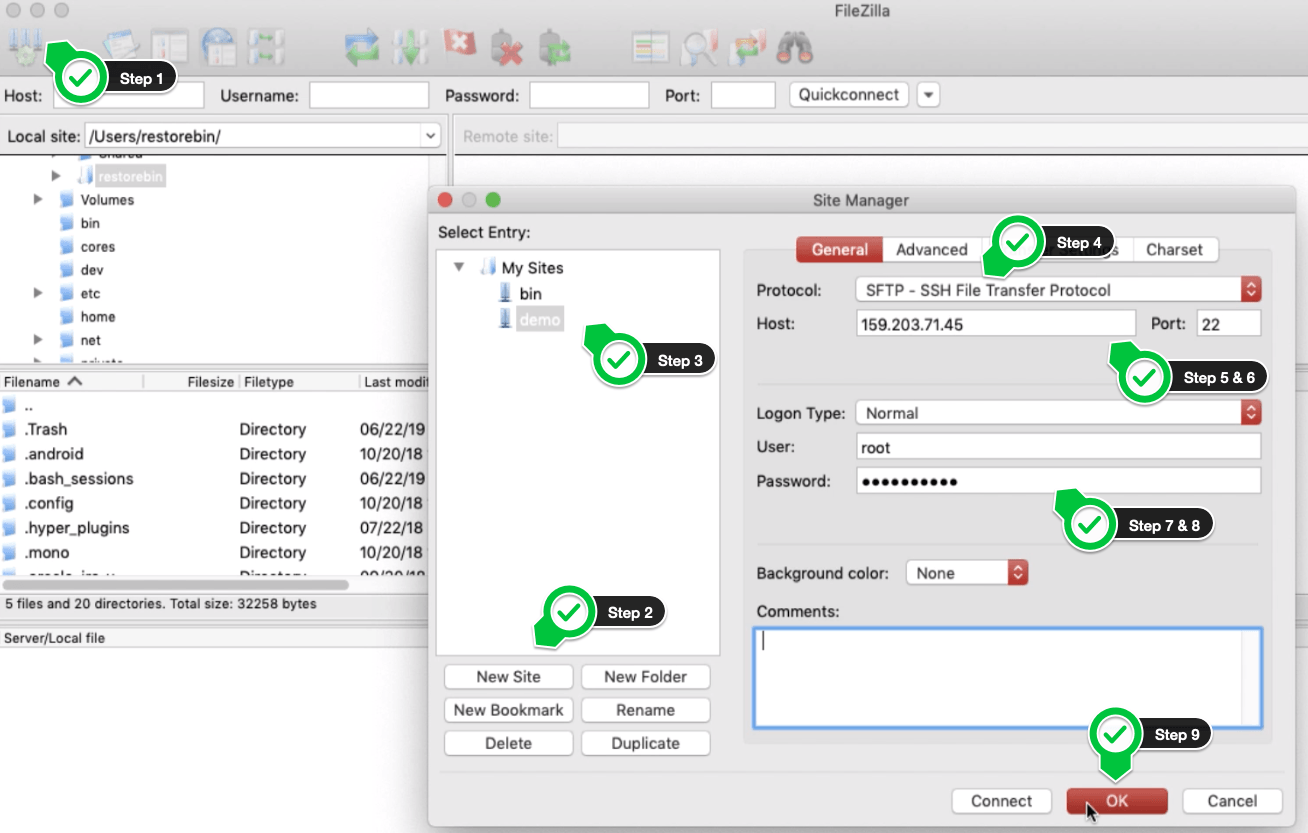
- Open the FileZilla Software and Hit on the Host command button
- A new window will open; hit on New Site command button
- Give a name to the New Host; say, suppose DEMO
- From the Protocol drop-down, select the SFTP – SSH File Transfer Protocol
- Next, Enter the Host Address, i.e., your Server IP Address
- Enter the SFTP connection Port number as 22
- Next, select the Logon Type as Normal and User as root
- Enter the root UNIX password that we have set up during the first-time login into SSH
- Hit on the OK command button to add the new site host to the list
- The new site host is added to the FileZilla software
- Now to access the Ubuntu Cloud via SFTP, open the newly created site host, i.e., DEMO, and hit on Connect button.
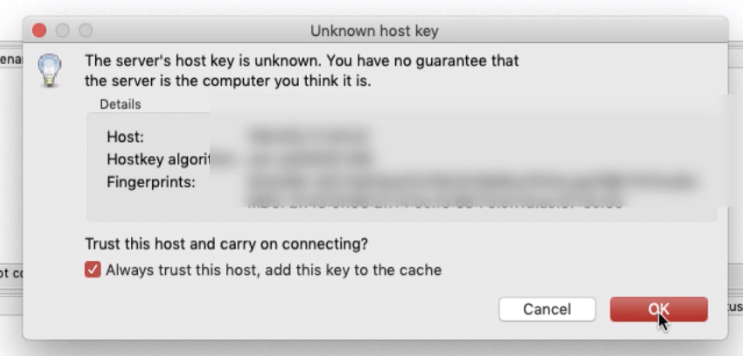
- Allow the host server key to save in the computer by selecting the checkbox “Always trust this host, add this key to the cache” and hitting the OK command button – for the first time, login only.

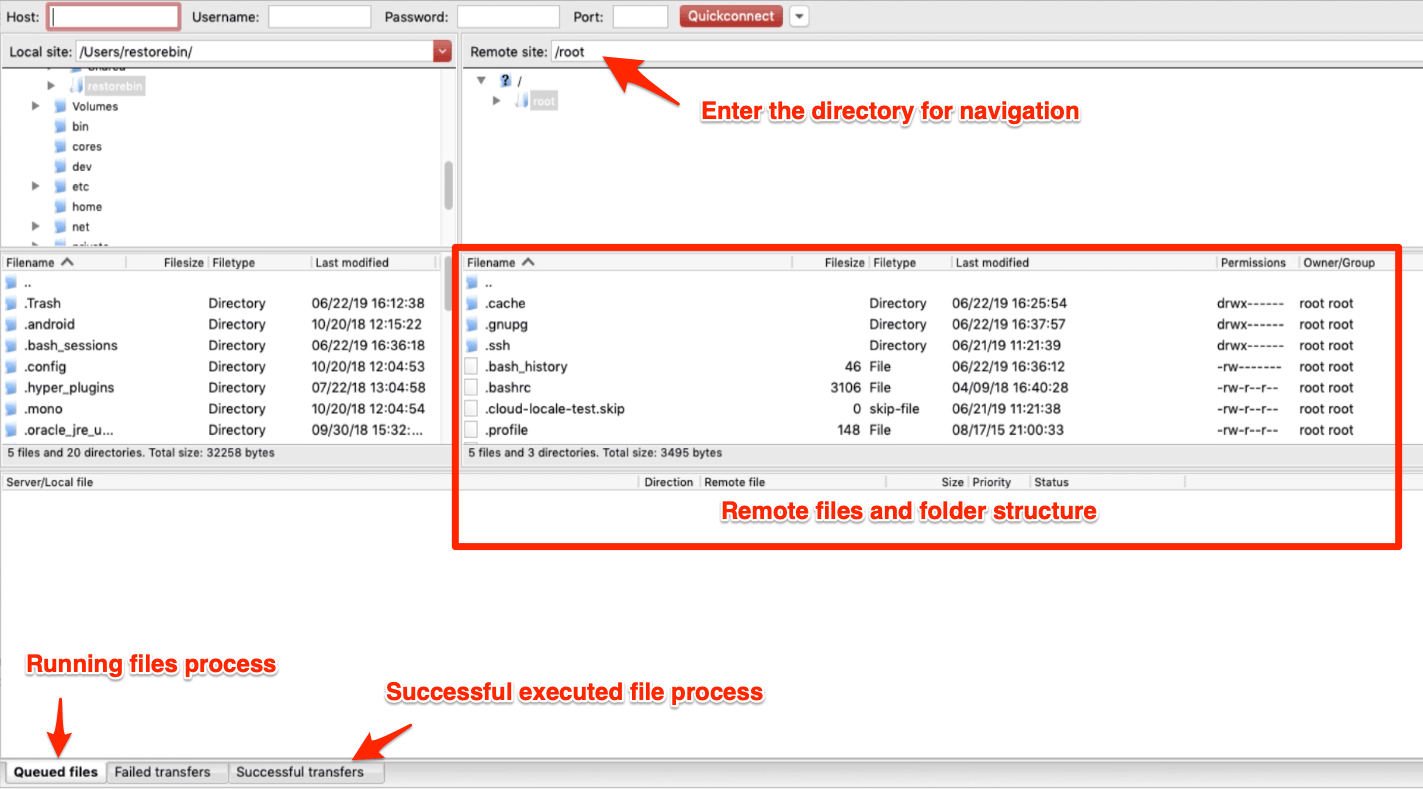
- That’s it; you will now be able to see and navigate through all the Ubuntu Cloud Server files and even data transfer using the FileZilla SFTP client.
Login SSH and STFP Client Video Demo
Watch the video demo of how to log in SSH using the macOS Terminal and the later part step-by-step procedure to login into the STFP FileZilla client to remotely access the server files and directories.
I hope you liked the video; please subscribe to our channels for the following videos.
What’s next in the #CloudServer Series?
After learning how to log in to SSH and use SFTP in this article, we will learn how to install the LEMP stack on Ubuntu Cloud Server and make the best possible configuration.
In the future, we will be using the same UNIX username and password to manage our Ubuntu Cloud Server remotely.

