Generally, it’s good to have a backup of an online website. Thankfully, DigitalOcean has the feature to enable weekly droplet backups at a nominal cost. If you’re running a WordPress Blog, having a remote backup is also a must along with this weekly backup; this is free.
Apart from the Backup, the DigitalOcean also supports taking a snapshot of the server in real-time. We can use this snapshot for recreating or spinning another droplet using the same settings and configurations.
In this article, learn how to enable the weekly droplet backups option, an in-built feature in the DigitalOcean cloud console, and take the real-time snapshot image of the entire server.
If you’ve been following us, this is the eleventh article and video tutorial in our #CloudServer series. We previously published about configuring the Object Cache using Redis Server in this series.
Without further ado, let’s get started with DigitalOcean Droplet Backups & Snapshot —
Enabling Weekly Droplet Backups in Console
Liked I mentioned, the backup is a built-in feature available in every droplet (server) in DigitalOcean. All we need is to enable the weekly droplet option to get started.
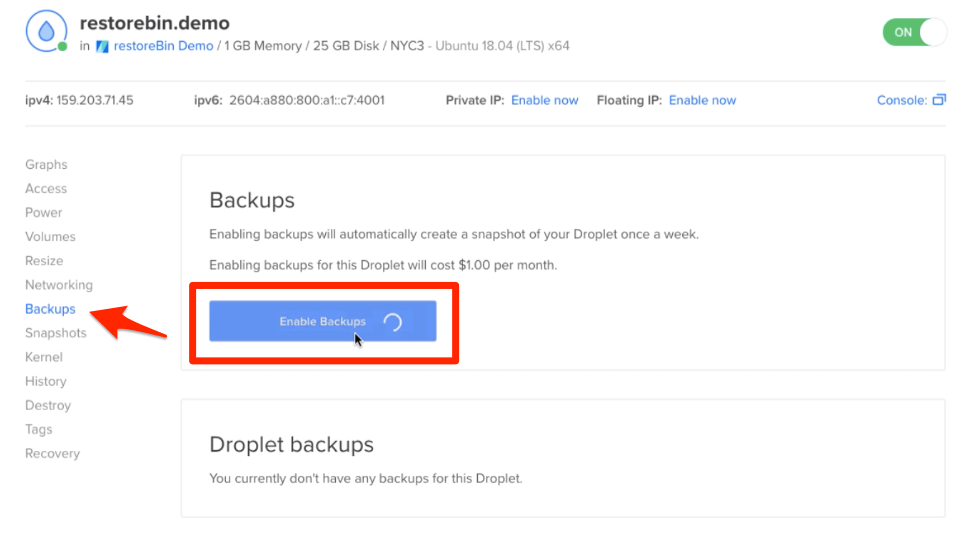
Follow the below steps to enable the Weekly Droplet backups in DigitalOcean:
- Login to DigitalOcean cloud console
- Select the Project and then Droplet that you need to enable backups
- Within Droplet, you’ll have an option for Backups (in the left sidebar); click and navigate to the page
- Hit on the [Enable Backups] command button
- That’s it! Weekly backups are now enabled.
Please note that Droplet backups incur the additional cost, which I think is nominal. The charges are 20% of your actual droplet cost. Suppose you spin a droplet server of $10; then the monthly backup charges are 20% of $10 which is $2.
DigitalOcean retains around 4 to 5 droplet backups at an interval of 1 week. The oldest back is automatically purged if the new backup is added today.
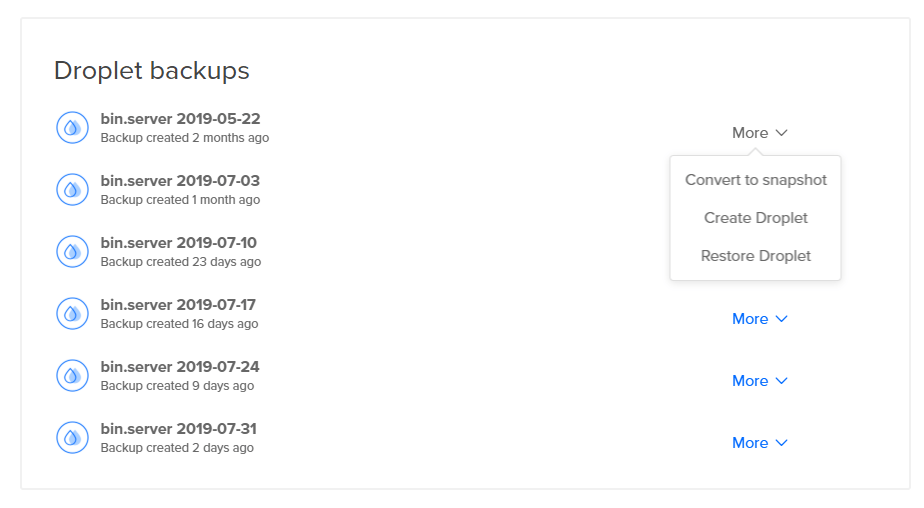
Using these backups, you can perform three tasks:
- Convert into Snapshot
- Create a new Droplet
- Restore the Droplet
If you convert the Droplet Backup into Snapshot, this will further enable you to perform snapshot actions.
Power Off and Take a Snapshot of Cloud Server
While the Backups feature is automatic and not real-time, Snapshot is another option for backing up the server droplet. The snapshot is a manual process but in real-time.
The snapshot is helpful when you want to immediately spin the same droplet in another region or change the ownership. Also, if you’re making a significant upgrade on your server or website, it’s a good idea to have a snapshot just in case things go out of the way.
But when taking a snapshot image of your droplet, it’s recommended to poweroff cloud server to maintain the consistency in data. Hence, I do not recommend taking a snapshot on a live site. However, the test or staging site shouldn’t be a problem.
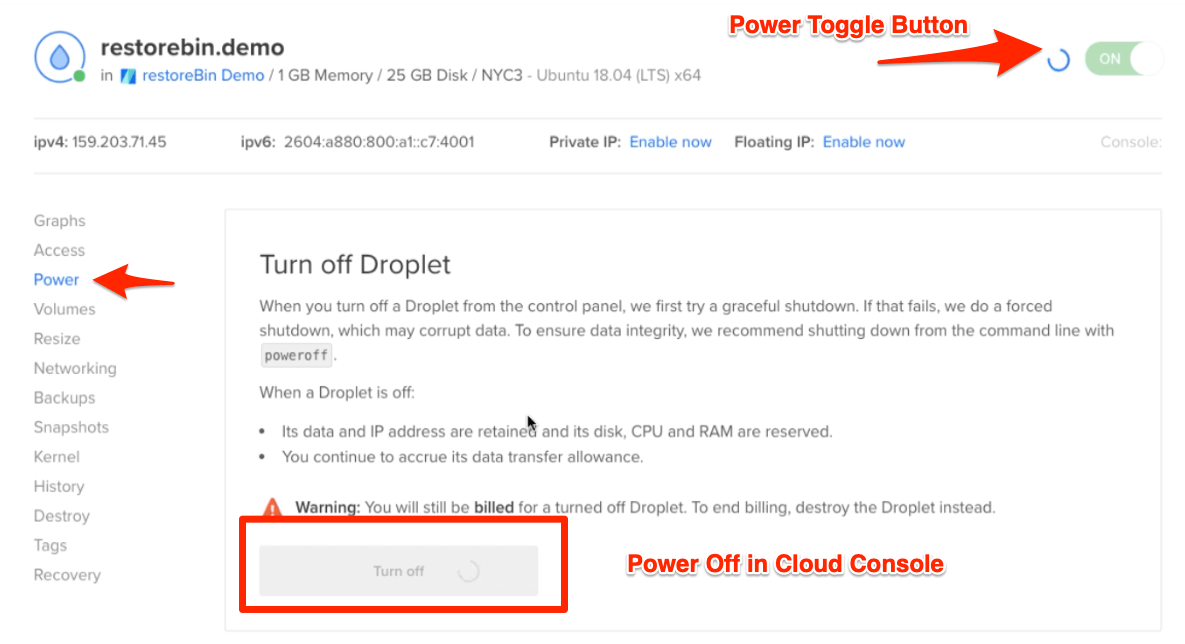
Also, we can power off the droplet from the DigitalOcean console; however, it’s not recommended. Instead, we should power off from the SSH login on Cloud Server.
Follow the below steps to power off and take a snapshot of the DigitalOcean droplet:
- Login to the SSH client of your cloud server
- Run the poweroff command to turn off the server
- Next, log in to the DigitalOcean cloud console
- Navigate to Projects and then select the Droplet
- Access the Snapshot tab available in the left sidebar within the Droplet area
- Make sure that Droplet is PowerOff and hit on the [Take live snapshot] command
- Wait* for the process to complete — it will display a progress bar
- Your snapshot will be ready once the process is completed
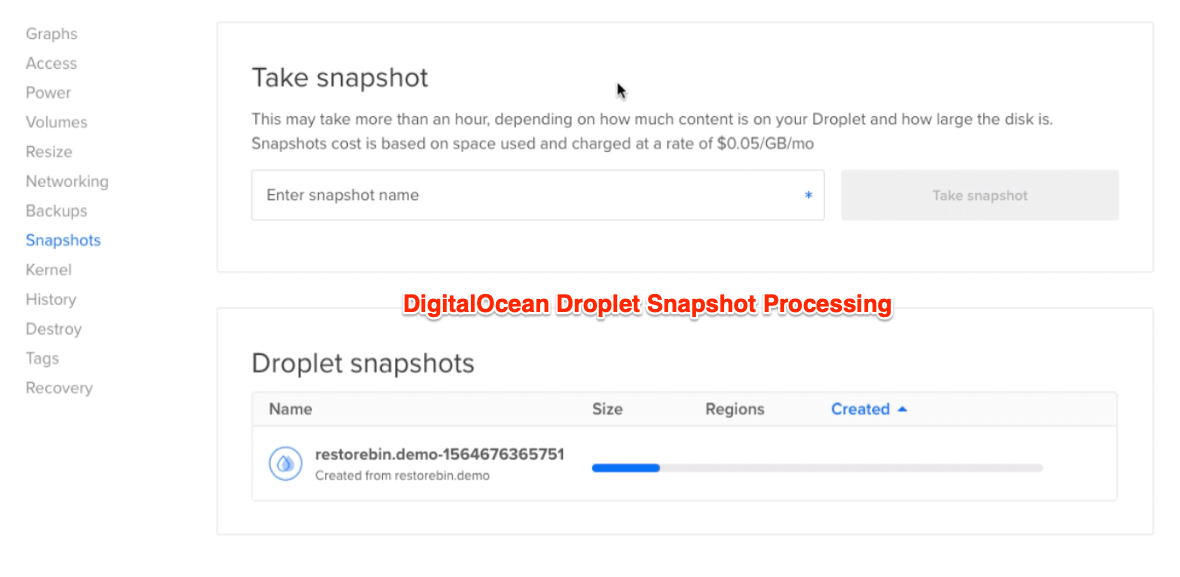
[*Processing snapshot takes around 1 min per GB]
Once the droplet processing is completed, do not forget to Power ON the droplet by toggling the power button available in the droplet console. You can also visit the Power tab in Droplet to turn on the droplet.
Like backups, the snapshot also incurs charges; however, they are charged based on GB storage. Its charges are $0.05 per GB per month of actual files and data storage.
There is no limit to how long you want to retain the snapshot image in your cloud console. You need to delete the snapshot image to stop the overhead charges manually.
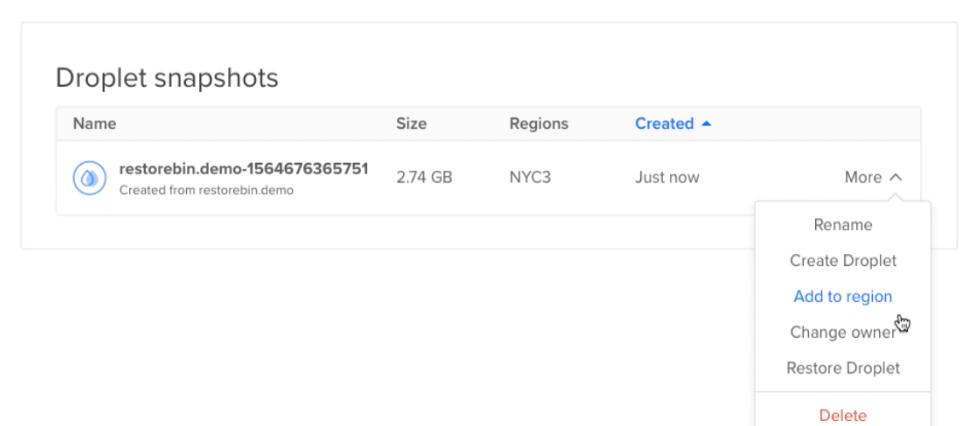
As mentioned above, once the snapshot is created, you can perform the following actions:
- Change Ownership
- Create a New Droplet
- Restore the Snapshot
- Add the Snapshot to the new Region
- Destroy the Snapshot
We can use two types of migration techniques in this —
- Changing the Ownership
- Migrating the Droplet Snapshot to a different region
But, you may be unable to migrate the snapshot out of DigitalOcean. However, you can use the scp command for migrating entire folders and files from one server to another.
Video demo of the DigitalOcean Droplet Backups
Watch the video tutorial on enabling the DigitalOcean droplet backups and create a snapshot image of the live server.

I hope you liked the demo tutorial; please subscribe to our youtube channel.
What’s next in the #CloudServer series?
We have now learned how to enable the backup in the DigitalOcean cloud; next, we will see how to keep and maintain the Ubuntu Cloud server up to date.
Maintenance tasks like the server update, upgrade and schedule a reboot.